
Dropbox has many file sharing options and ways to use it. In this example, I wanted to walk through an example of how a contractor could use Dropbox to share multiple files with a client. One of my client’s specifically needed this capability. They needed to show many before and after pictures rapidly with their clients for various property addresses. Each client could potentially have more than one property address and there would almost always be a before and after set of pictures to share separately, plus potentially several other sets for different stages of work. Email definitely wasn’t going to cut it, the process needed to be very easy and quick from a user’s perspective. We gave consideration to using their own website to share the images and publishing the images on the internet under the property address with a short description of the nature of the work. While this would have certain SEO benefits for the site, it might create confidentiality issues for some properties or some clients. So Dropbox was chosen.
Here’s the process to use Dropbox to make things as fast and easy as possible
- Step 1 You (the person that wants to share) have to have a Dropbox account. They offer very good free plans and I recommend starting with one of them. For this exercise, you do not have to leave every picture you ever take loaded into Dropbox, so a Free account will likely be enough. Sign up for Dropbox here
- Step 2 – This will install a quick desktop application on your computer. It will ask you to designate a Dropbox folder somewhere on your hard drive. Remember where this folder is, its where you will store your photos when you download them from your camera!
- Step 3 – Go into the Dropbox Folder and then create a new subfolder for ‘Client Images’ or anything you want to call it.

- Step 4 – next you will need to create a sub folder inside of ‘Client Images’, one for each client
- Step 5 – Then as you process through jobs, you will need to create a new sub folder for each property address. Make sure you make the address folder inside the client’s folder that owns/manages that property.
- In this example Client A owns 110 Fernwood

- Step 6 – Add images for each property into its respective folder. In this case we drag and drop pictures from our camera for 110 Fernwood to its Dropbox folder for 110 Fernwood, you might even shorten this process taking individual images off your camera flash card and putting it straight into your Dropbox folder on your computer.

- DROPBOX AUTOMATICALLY UPLOADS THESE IMAGES FOR YOU!

- You can later view these images on the Dropbox site by logging into your account. It might take a few minutes for all the images to upload depending on the speed of your internet connection

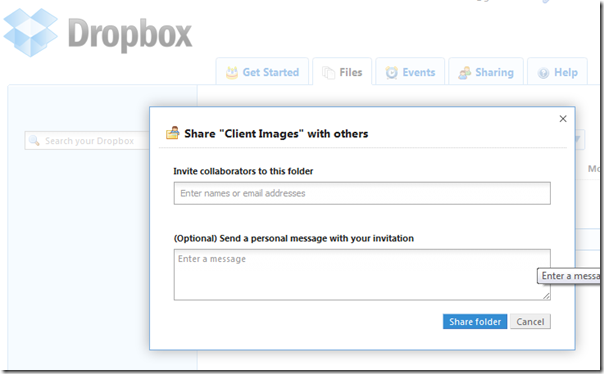
- Step 7 – When you setup a new client folder, you will need to ‘Share’ that folder with your client. To do this login to the Dropbox website, click on Client Images (all your folders automatically load up too!) then pick the folder for the client in question that you want to share

- Check the box and click the button Invite to Folder
- Enter in the email address for your client (yes you can enter multiple email addresses if your client has several people on their team). type a short message explaining they will be able to find their images here and hit share folder.

- If your client already has a Dropbox folder (it is a popular service and has been around for a while), they will get access to this folder and everything in it.
- They will need to accept the invitation and then they can access the images.
- If your client does not have a Dropbox folder, they will be invited to join Dropbox with a free account and if they do, your account file size limit will be increased for free (for every referral!)
- After this every image you load up to the folder will be available for your client to view or download or both. They cannot delete them without your permission as you are the owner of the files you upload.
That’s it!